Attendance
View, search, and manage employee attendance records with check-in/check-out tracking, photo verification, and GPS location mapping.
Step 3: Attendance
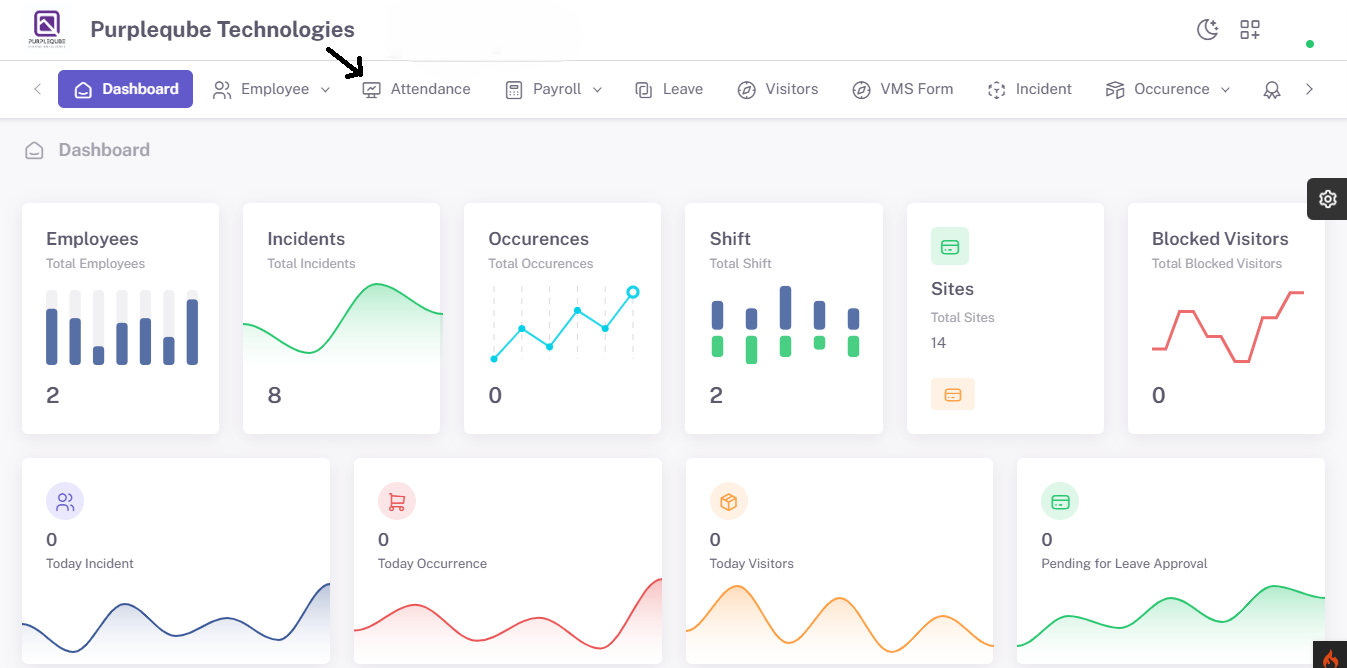
Accessing the Attendance Module
From the main Dashboard, navigate to the Attendance module by clicking the Attendance tab in the top navigation bar. The Attendance tab is located between the Employee and Payroll tabs in the main menu.
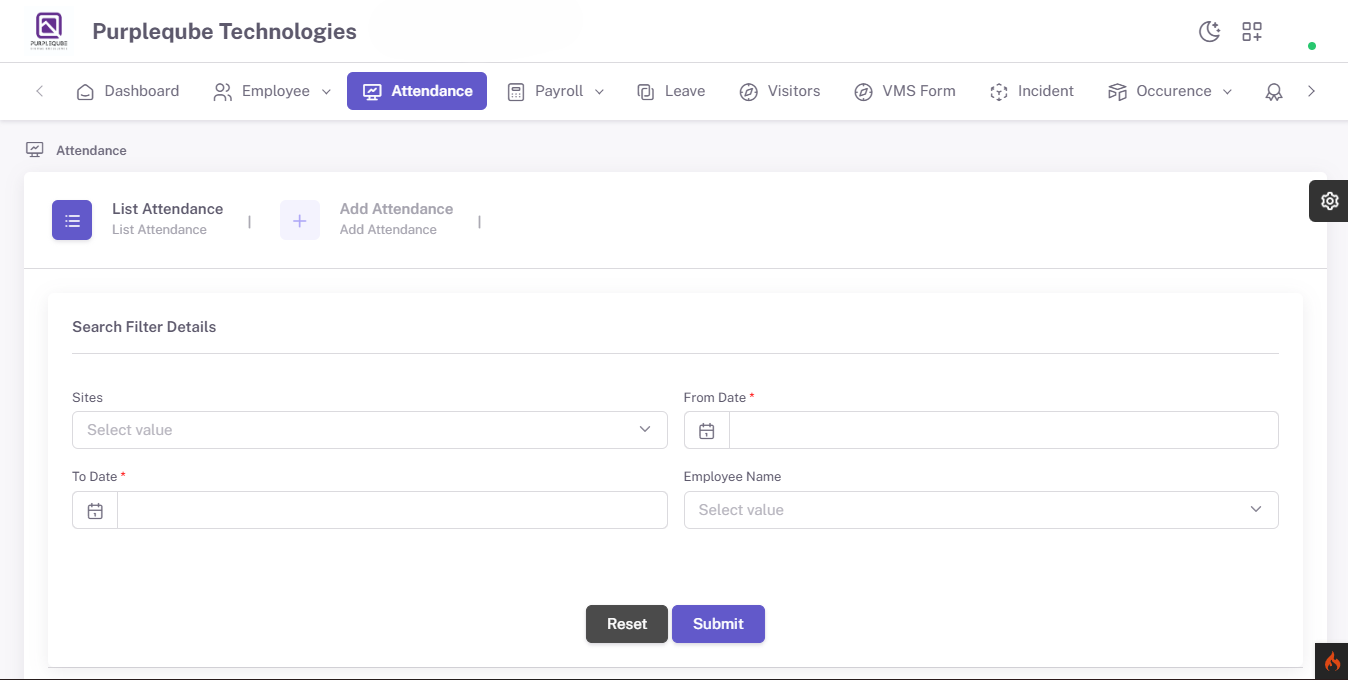
Attendance Module Overview
The Attendance module opens with two primary tabs: List Attendance and Add Attendance. The List Attendance tab is active by default and displays the Search Filter Details section, allowing you to filter records before viewing them.
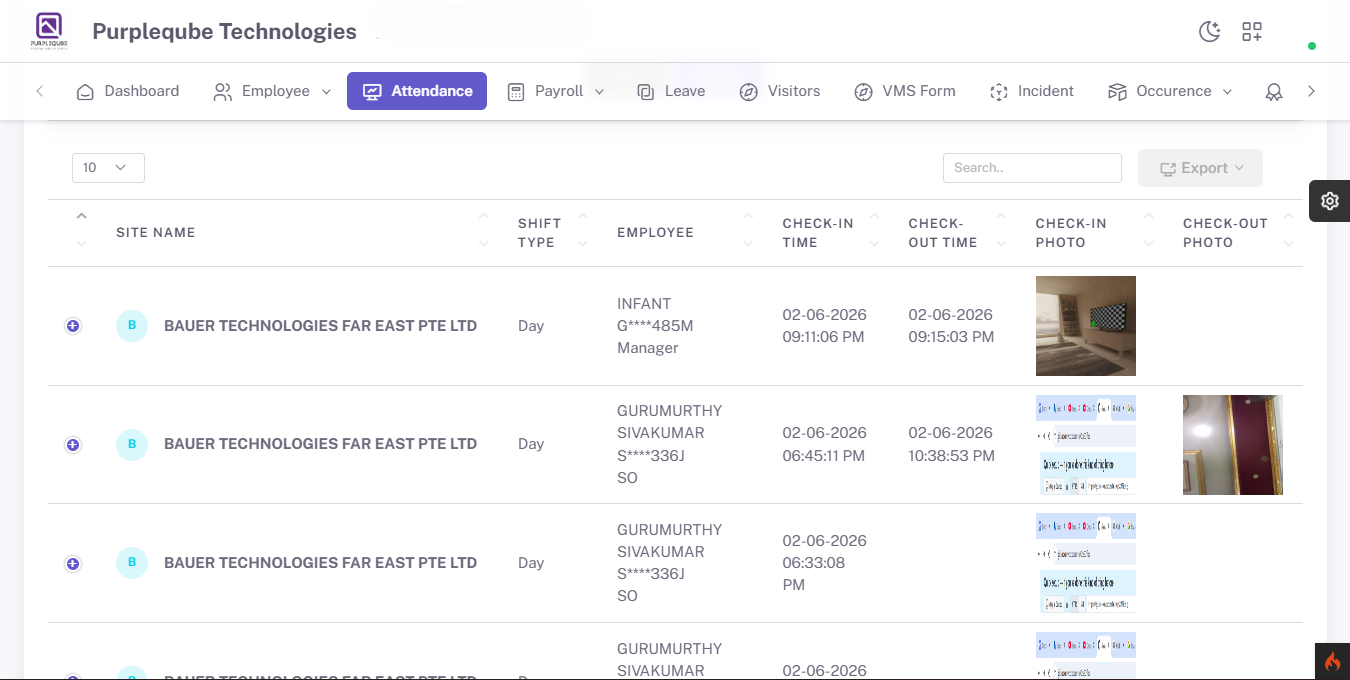
Attendance List
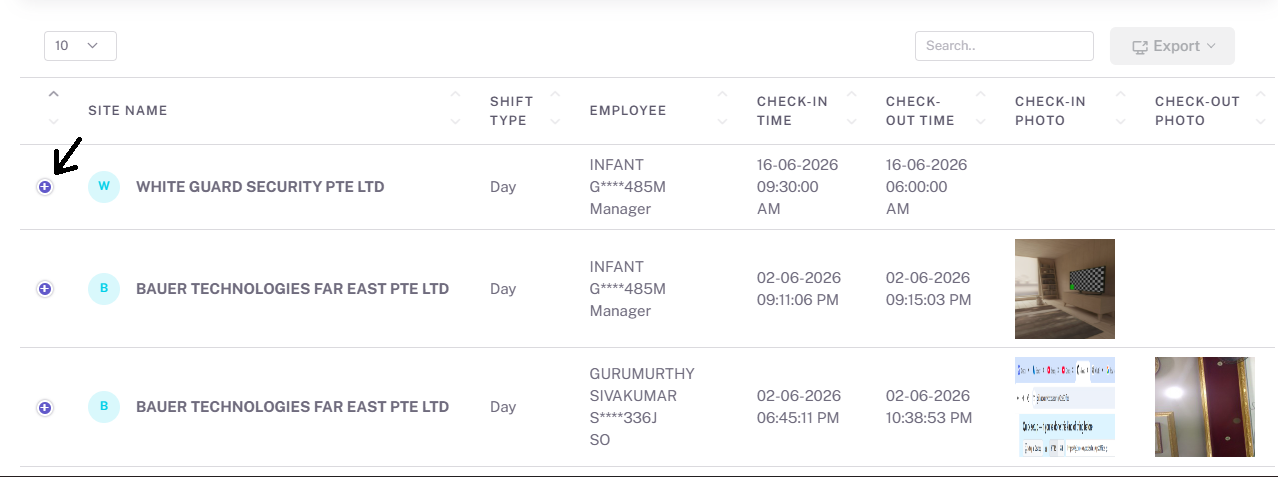
The attendance screen displays a comprehensive data table with the following columns:
- Site Name – The work site or project location where the employee is assigned (e.g., BAUER TECHNOLOGIES FAR EAST PTE LTD).
- Shift Type – The employee's assigned shift (e.g., Day Shift, Night Shift, General Shift).
- Employee – Name and masked ID of the employee (e.g., INFANT G****485M, Manager).
- Check-In Time – The date and time when the employee checked in.
- Check-Out Time – The date and time when the employee checked out.
- Check-In Photo – Photo captured during employee check-in for verification.
- Check-Out Photo – Photo captured during employee check-out for verification.
Each row also features an expandable plus (+) icon on the left to reveal additional record details.
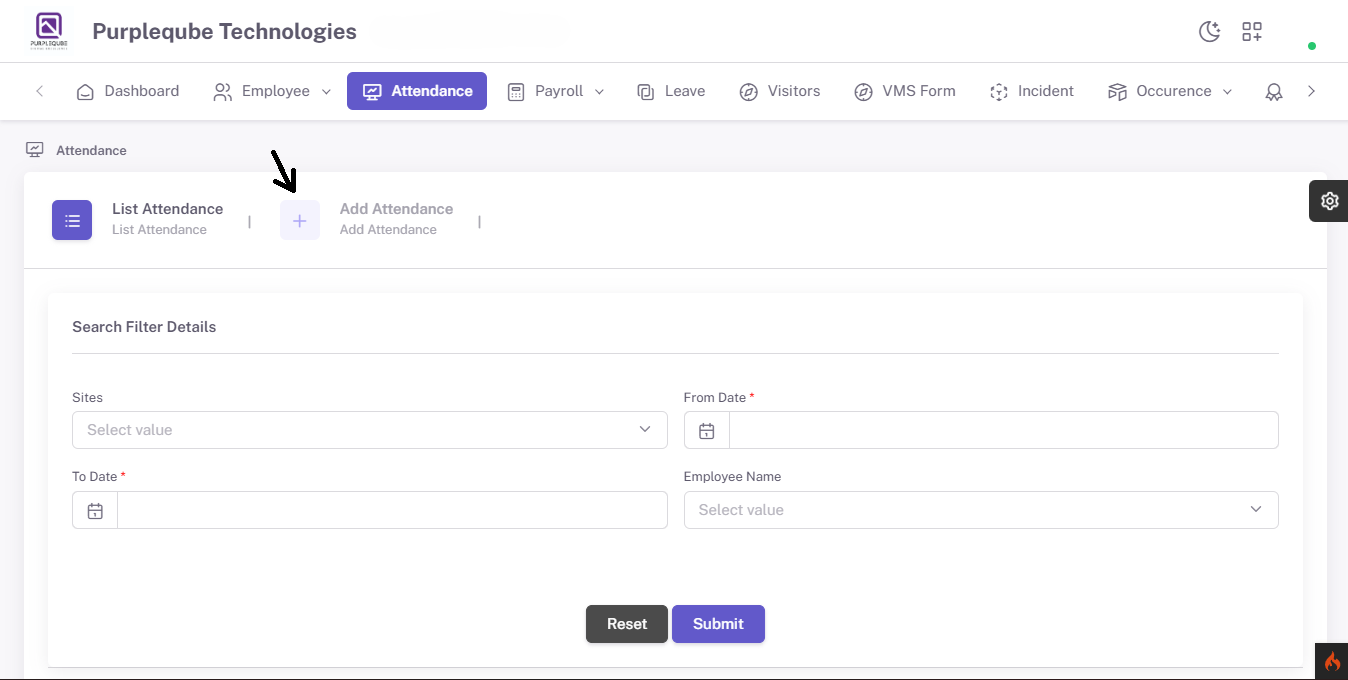
Adding a New Attendance Record
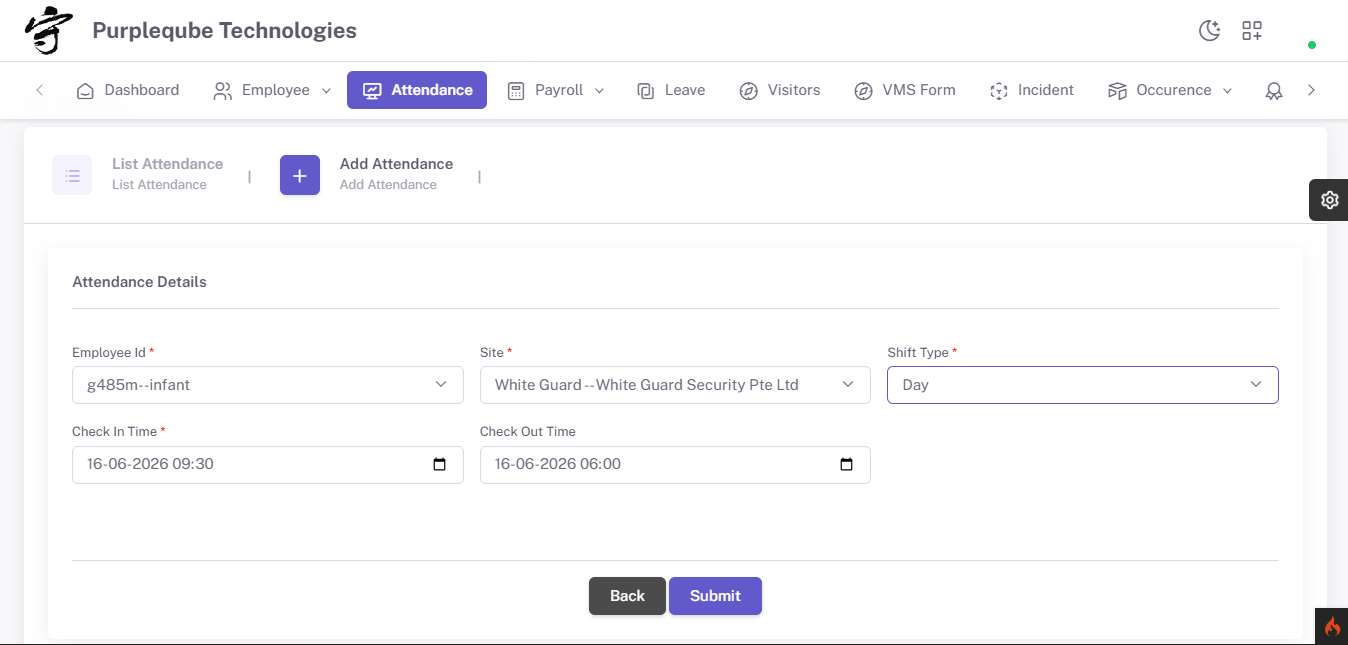
To manually add an attendance entry, click the Add Attendance tab. This tab is located next to the List Attendance tab and is marked with a plus (+) icon. The arrow indicates where to click to begin creating a new attendance record.
Fill in Attendance Details
The Add Attendance form requires the following information:
- Employee Id – Select the employee from the dropdown (e.g., g485m--infant).
- Site – Choose the work site from the dropdown (e.g., White Guard --White Guard Security Pte Ltd).
- Shift Type – Select the shift type (e.g., Day, Night, General).
- Check In Time – Enter the date and time when the employee checked in (e.g., 16-06-2026 09:30).
- Check Out Time – Enter the date and time when the employee checked out (e.g., 16-06-2026 06:00).
After filling in all required fields, click Submit to save the record, or click Back to return without saving.
Attendance Record Created Successfully
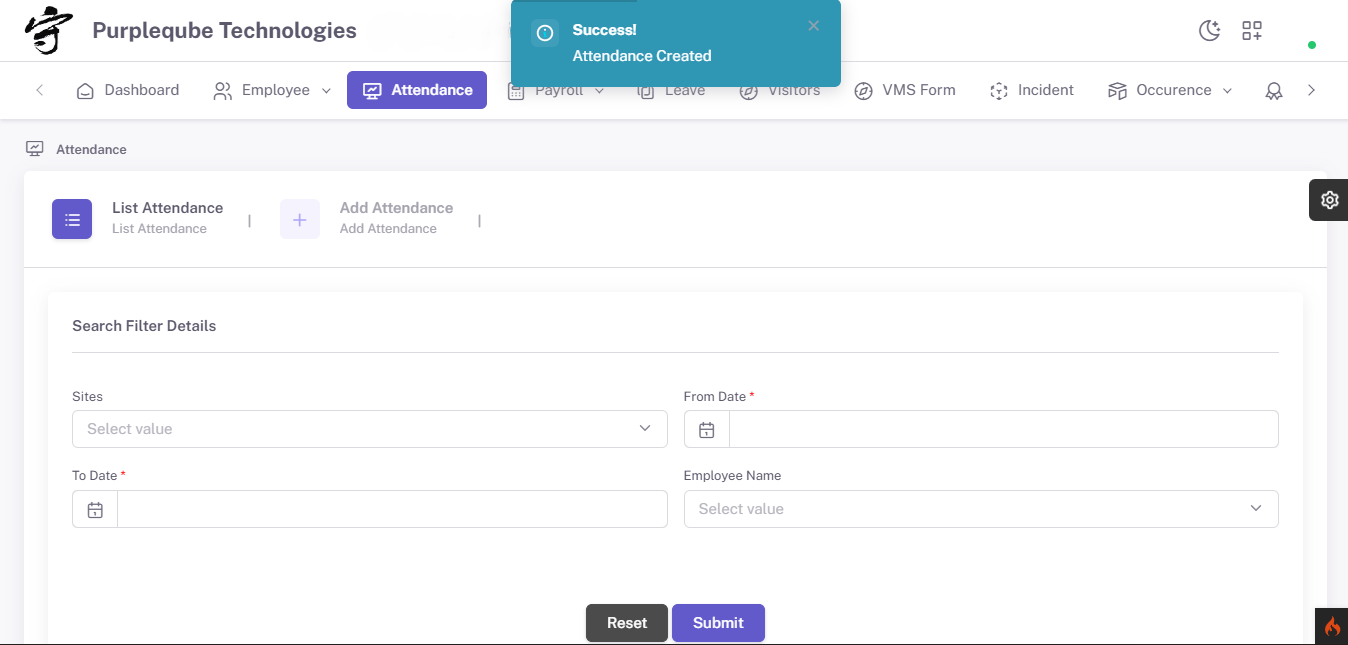
Upon successful submission, a green success notification toast appears at the top of the screen displaying "Success! Attendance Created". The system automatically returns to the List Attendance view with the Search Filter Details section.
Search and Filter Options
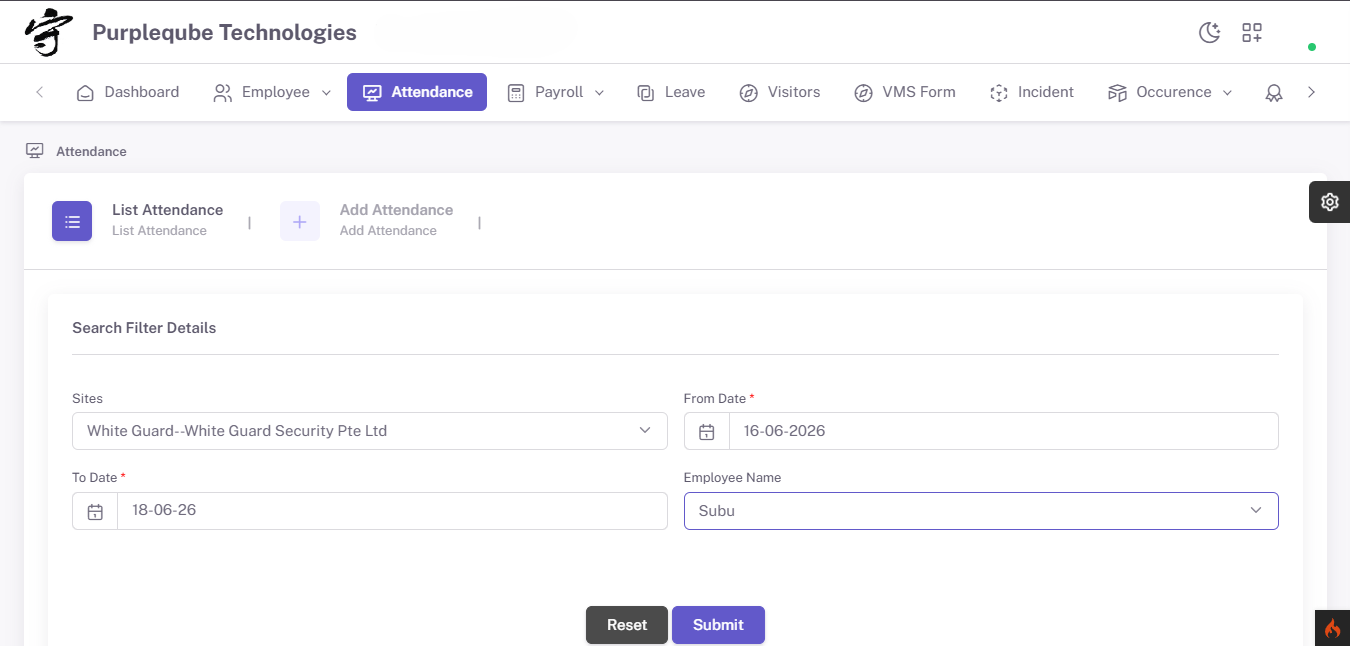
Users can quickly locate attendance records using the available search and filter options:
- Sites – Filter attendance records by specific work sites (e.g., White Guard--White Guard Security Pte Ltd).
- From Date – Select the starting date for the attendance search (e.g., 16-06-2026).
- To Date – Select the ending date for the attendance search (e.g., 18-06-26).
- Employee Name – Search attendance records for a specific employee (e.g., Subu).
After selecting the required filters, click Submit to display the matching attendance records. Click Reset to clear all filter values.
Viewing Filtered Results
After applying filters, the attendance table displays only the matching records. Each row has a plus (+) icon on the left side. Click this icon to expand the row and view more details about a specific attendance record, including full check-in/check-out information and available actions.
Record Details and Actions
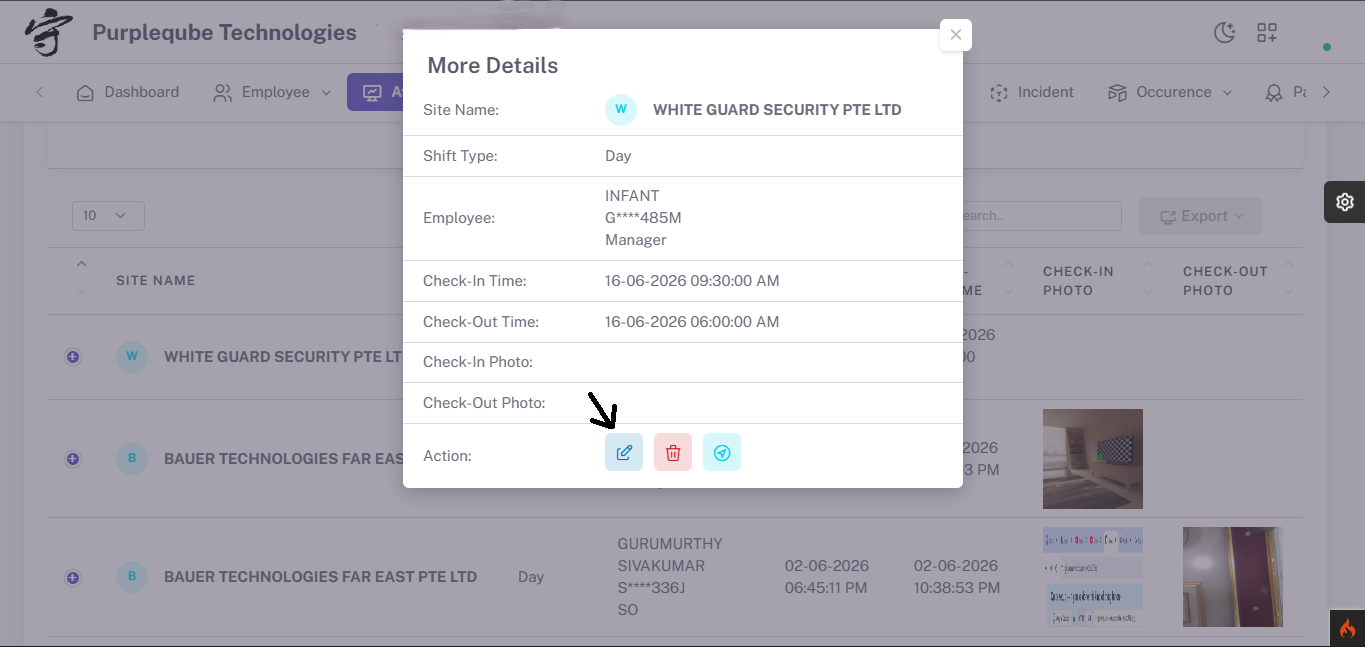
Clicking the plus icon opens a More Details modal popup that displays the complete information for the selected attendance record:
- Site Name – WHITE GUARD SECURITY PTE LTD
- Shift Type – Day
- Employee – INFANT G****485M (Manager)
- Check-In Time – 16-06-2026 09:30:00 AM
- Check-Out Time – 16-06-2026 06:00:00 AM
- Check-In Photo – Photo thumbnail (if available)
- Check-Out Photo – Photo thumbnail (if available)
The Action section at the bottom provides three buttons:
- Edit (pencil icon) – Modify the attendance record details.
- Delete (trash icon) – Remove the attendance record permanently.
- Location (map pin icon) – View the GPS location of the check-in on Google Maps.
Editing an Attendance Record
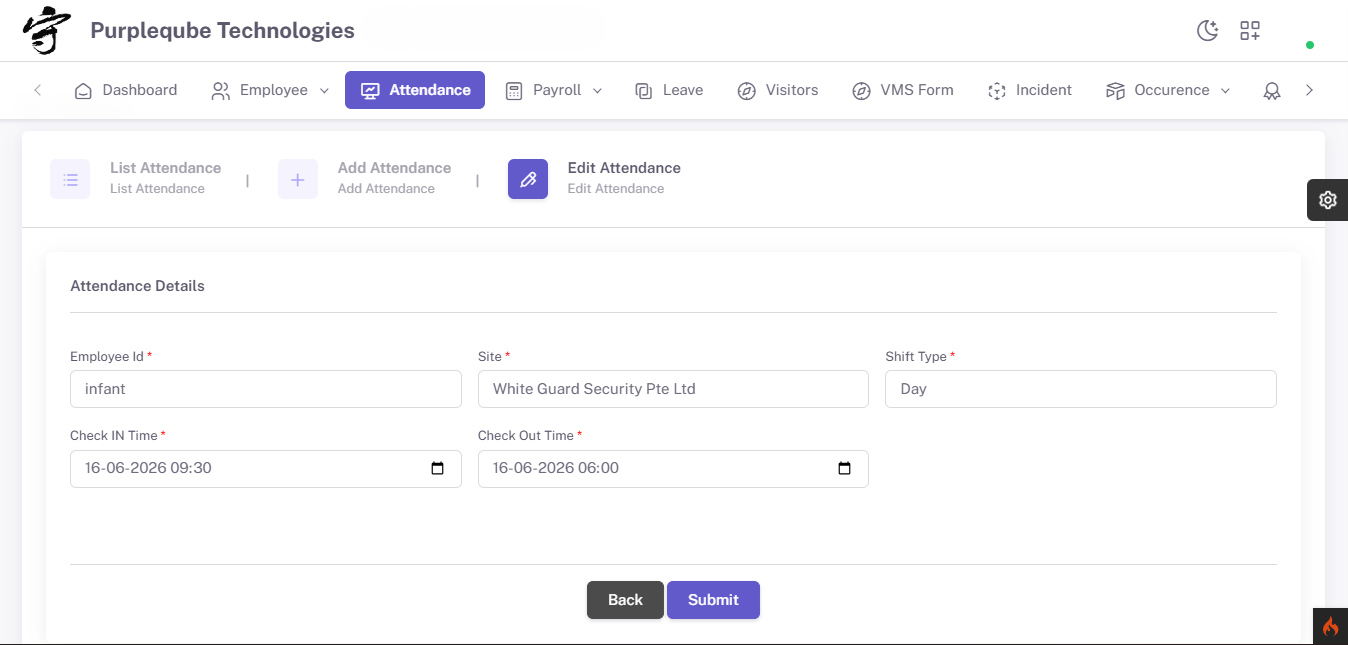
Clicking the Edit button opens the Edit Attendance tab with a pre-filled form containing the existing record data:
- Employee Id – Pre-populated with the employee identifier (e.g., infant).
- Site – Pre-populated with the assigned site (e.g., White Guard Security Pte Ltd).
- Shift Type – Pre-populated with the shift type (e.g., Day).
- Check IN Time – Pre-populated with the current check-in date and time (e.g., 16-06-2026 09:30).
- Check Out Time – Pre-populated with the current check-out date and time (e.g., 16-06-2026 06:00).
Modify the necessary fields and click Submit to update the record, or click Back to cancel the changes.
Attendance Record Updated Successfully
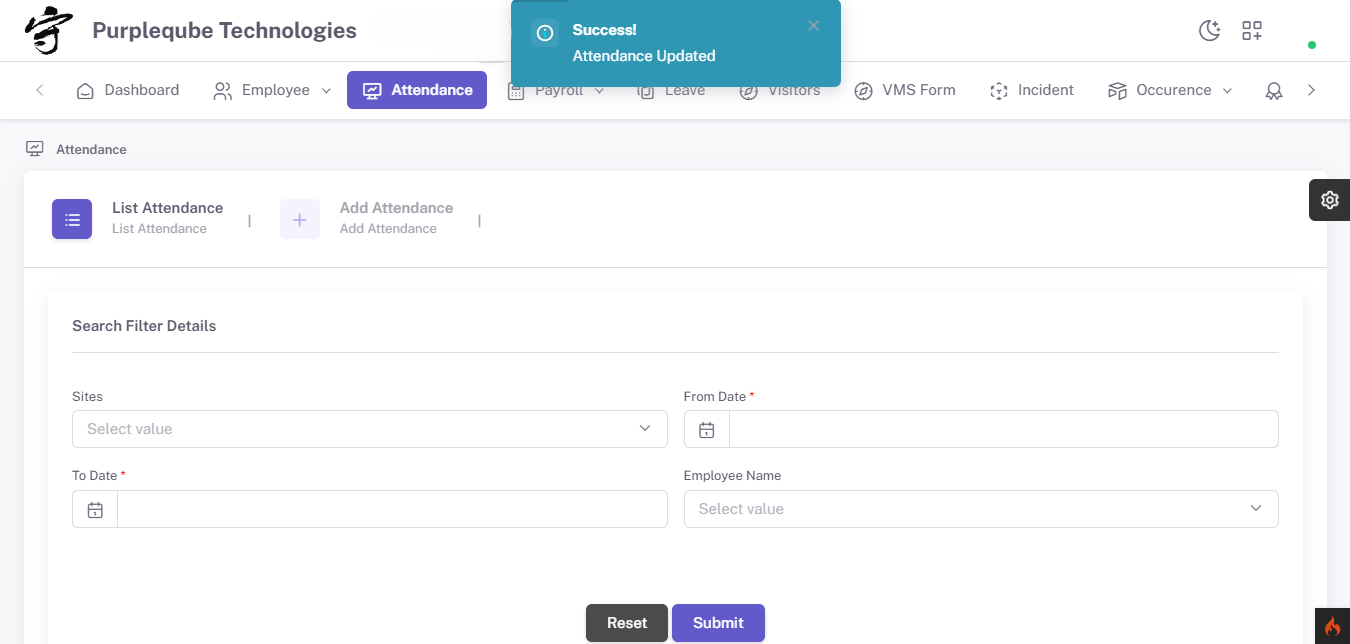
After submitting the edited form, a green success notification toast appears at the top displaying "Success! Attendance Updated". The system returns to the List Attendance view, and the updated record will reflect the new changes in the attendance list.
Deleting an Attendance Record
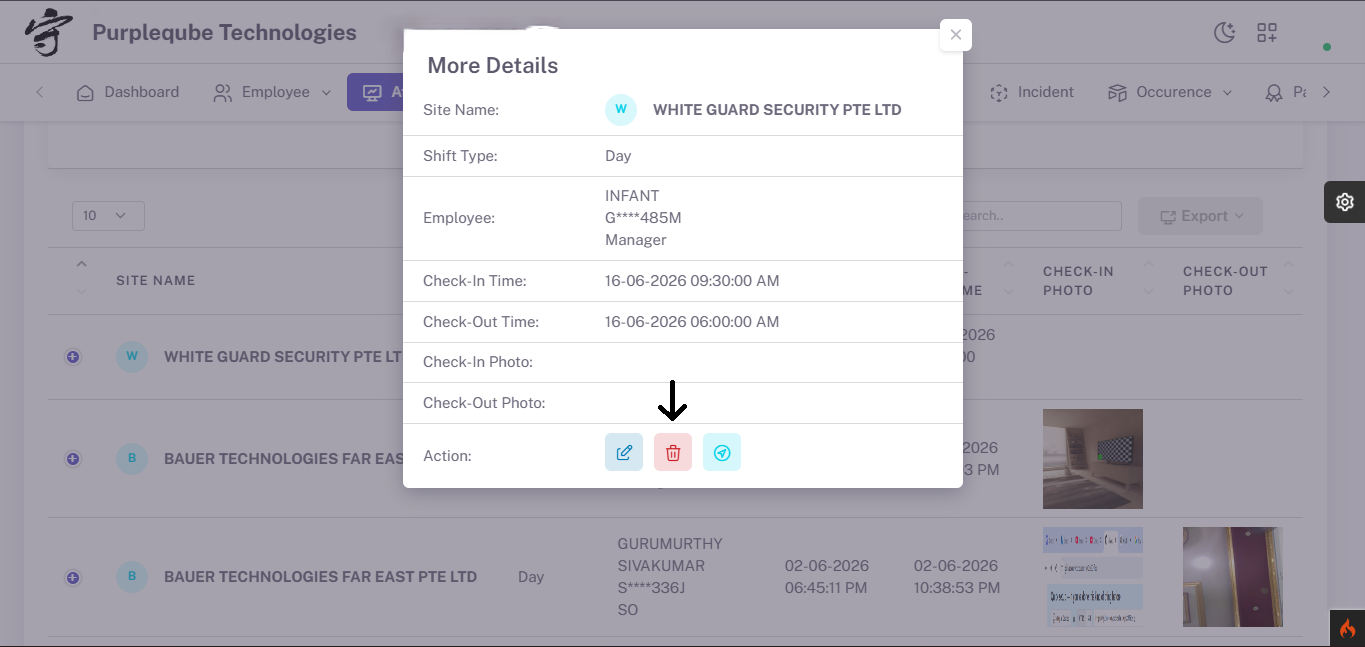
To remove an attendance record, open the More Details modal by clicking the plus (+) icon on the desired row. In the Action section, click the Delete button (trash icon) to initiate the deletion process. A confirmation dialog will appear to prevent accidental deletion.
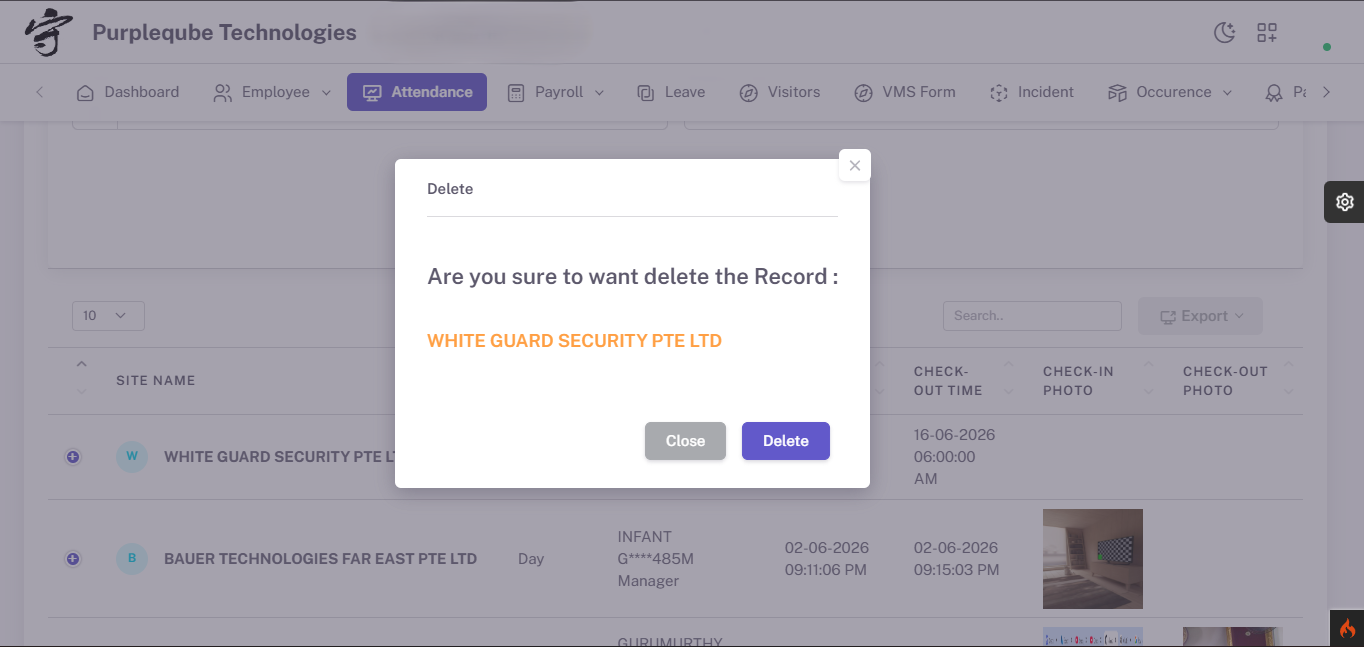
Delete Confirmation
A confirmation dialog appears with the message: "Are you sure to want delete the Record:" followed by the site name (e.g., WHITE GUARD SECURITY PTE LTD) highlighted in orange. To proceed with deletion, click the Delete button. To cancel and keep the record, click Close.
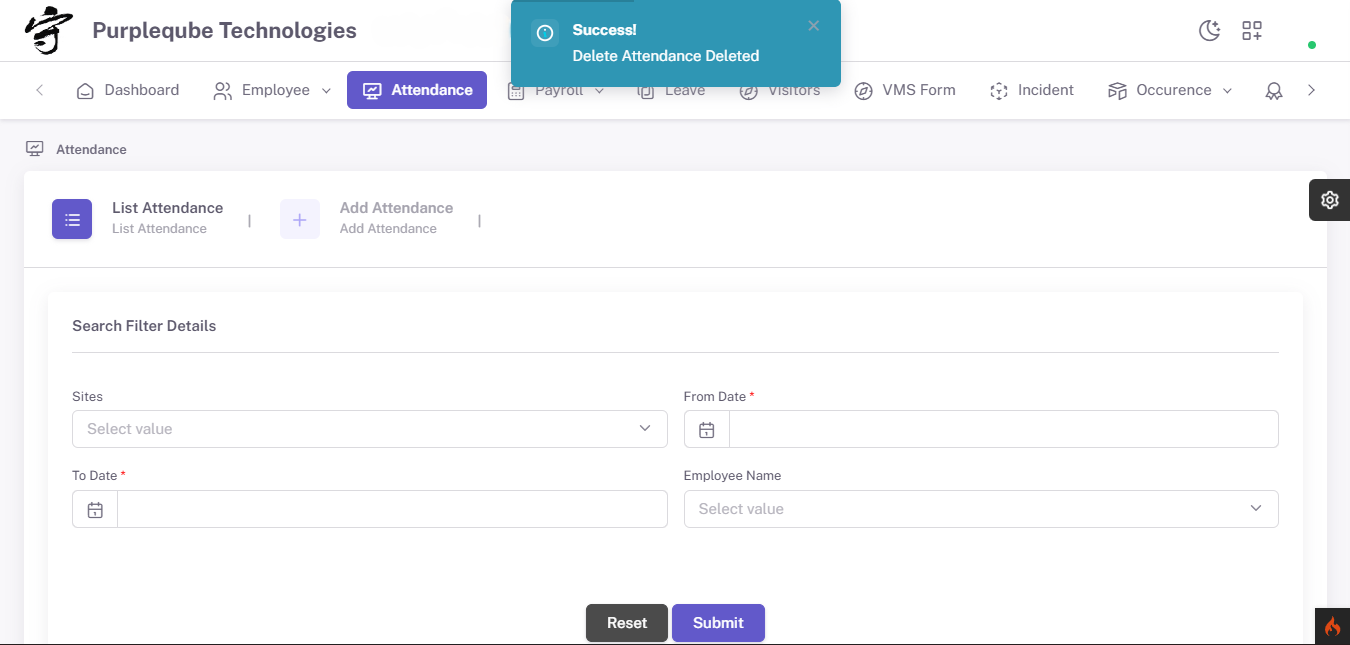
Attendance Record Deleted Successfully
After confirming the deletion, a green success notification toast appears displaying "Success! Delete Attendance Deleted". The record is permanently removed from the attendance list, and the system returns to the List Attendance view with the Search Filter Details section.
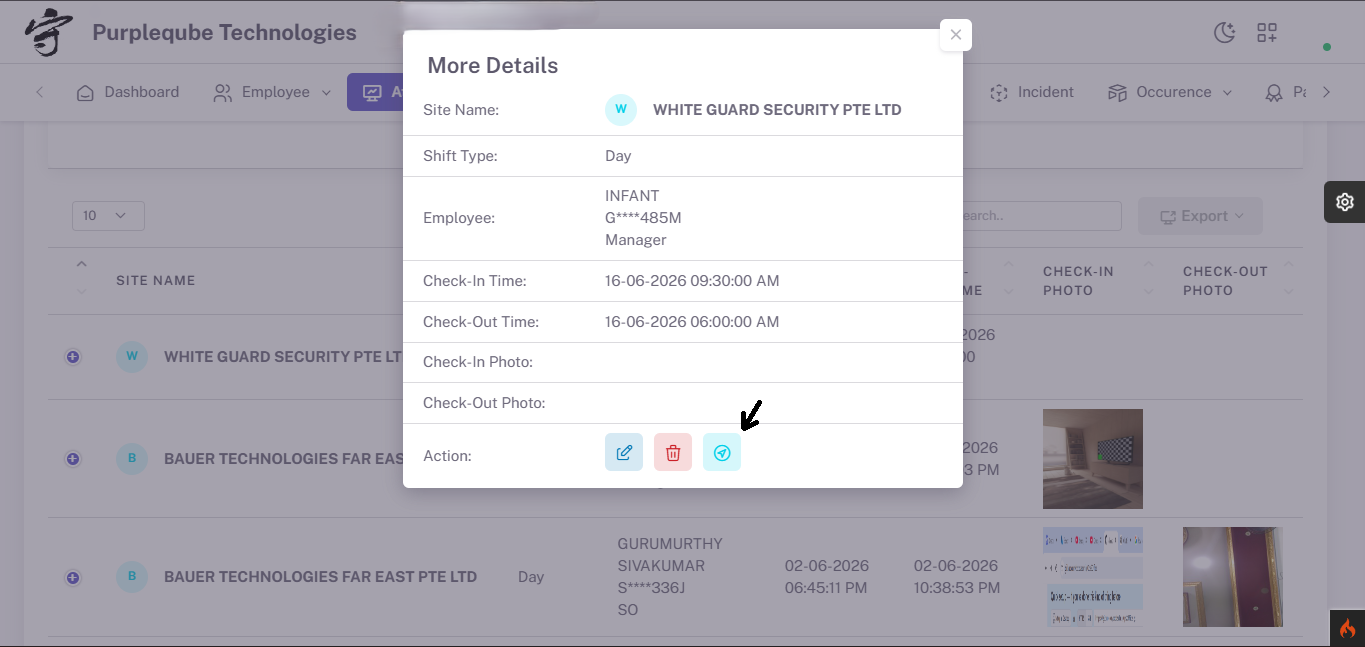
Viewing GPS Location
To view the geographical location where the employee checked in, open the More Details modal and click the Location button (map pin icon) in the Action section. This feature allows you to verify that the employee was physically present at the designated work site during check-in.
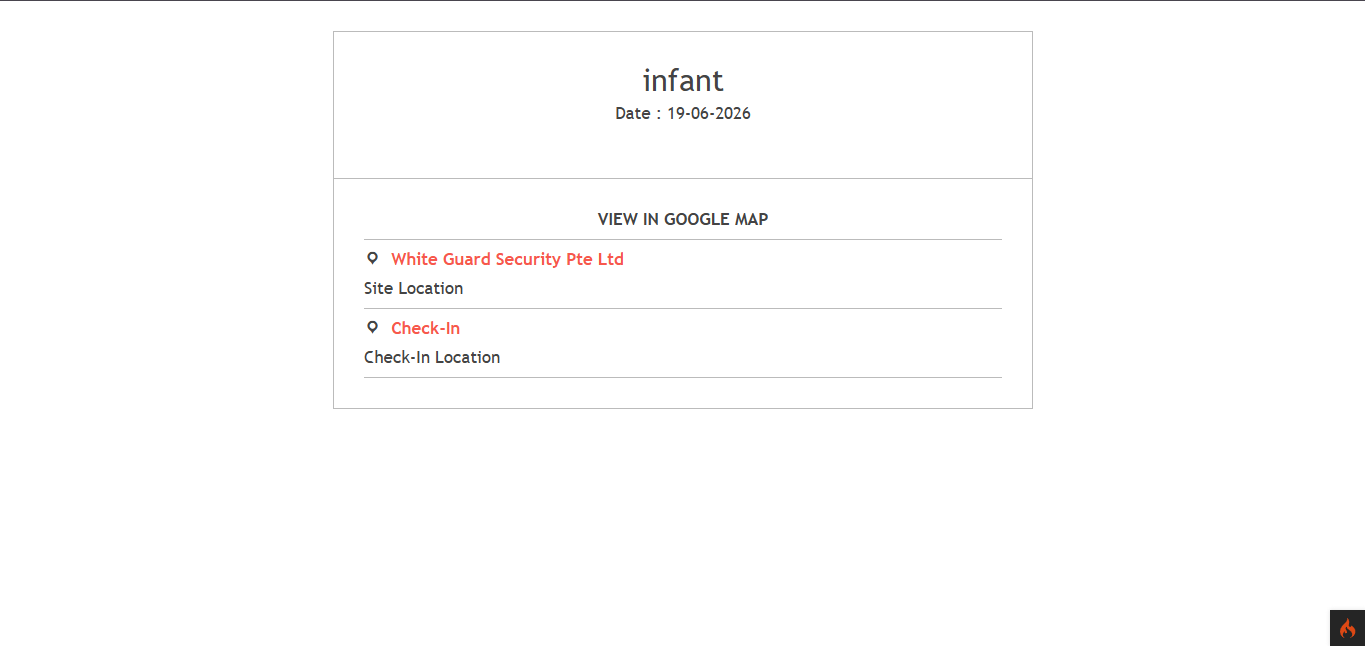
Location Tracking on Google Maps
Clicking the Location button opens a map view displaying:
- Employee Name – The name of the employee (e.g., infant).
- Date – The date of the attendance record (e.g., 19-06-2026).
- Site Location – The registered work site address (e.g., White Guard Security Pte Ltd).
- Check-In Location – The GPS coordinates where the employee checked in.
Click VIEW IN GOOGLE MAP to open the location in Google Maps for detailed navigation and verification. This feature ensures accurate location-based attendance tracking and prevents fraudulent check-ins.